
This project is one that can be created using MANY different themes. I've made ones for Christmas list shopping (used it to store photos of doing that and receipts and christmas lists and much more), I've made Travel themed ones, baby ones, etc..... and since they are so CHEAP to make and super simple you can make them for gifts and such super quick!
Here is what we are making today. It's a family themed one:


Here is how to make it:
Prepare Your Folder/Album:
I used a Two Pocket Folder. These are paper ones. Not plasticky and they do not have prongs.
1. Fold your folder in half and then in half again. I used a bone folder to make sure my creases were set and it was good and folded.


Adding Papers to the Album:
For the inside of the album:
the dimensions of the papers are:
* for the 4 long panels: 7 1/2 x 4 1/4 (you can see in the 2nd photo here that the paper does not go all the way down the pockets. This is to save paper and because you can't see down there anyway! LOL!)
* For the front of each pocket: 4 1/4 x 4 1/4 (back layer) and 3 3/4 x 3 3/4 for the front layer.
* Ink each piece before adhering to the folder.


For the outside of the Album
the dimensions of the papers are:
*4 1/4 x 11 1/2
When adding paper keep in mind the paper on the FAR LEFT is going to be your COVER! (in this case the dark paper with the orange, blue, and red flowers)
*Ink each piece before adding to the folder.

This is going to go on the panel that will be the BACK of the album. (in this case the one of the FAR LEFT - orange paper with white swirly flowers)
1. For this Cascade "album" you'll need to cut various papers from the kit (cardstock and patterns) in the following dimensions:
4 x 11
4x 10.5
4x 10
4x 9.5
4 x 9
4 x 8.5
4 x 8
4 x 7.5
4 x 7
4 x 6.5

2. You'll then want to punch holes in the top of this panel. ONLY through this panel. NOT through all 4.
3. You'll also want to punch holes in the TOP of the cascade album
4. Before you go to the next step - if you like to ink your papers then do so now

5. Once you have your holes punched - use a piece of ribbon from the kit and tie it on the album! Double knot it and make sure it's tight!

Now let's embellish the album!

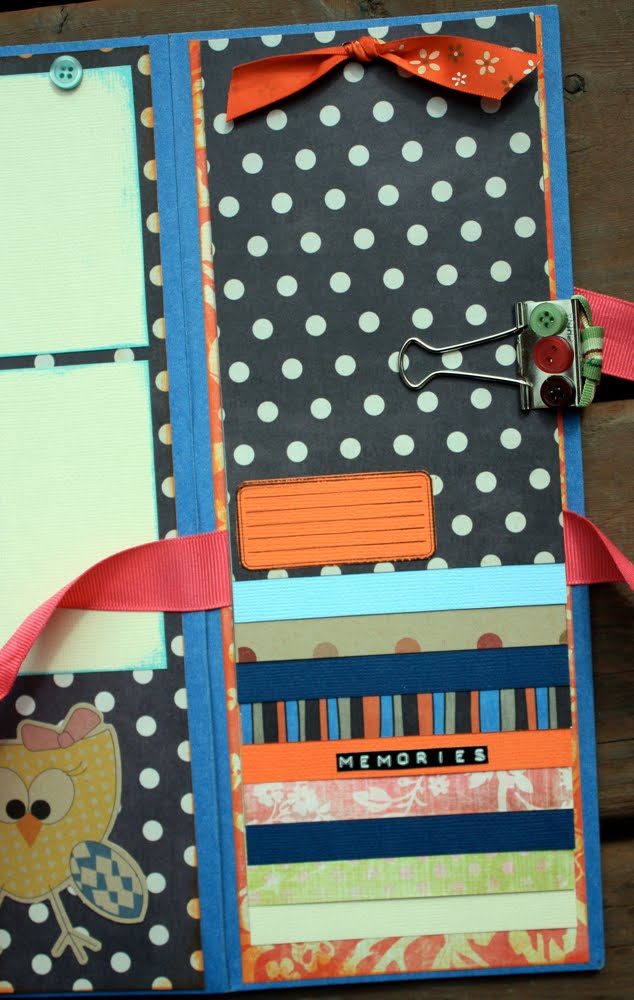
** Panel 1 (all the way on the right) has the cascade album behind it so you'll see the ribbon you tied through. I glued a button to the inside of one of the flowers on the patterned paper. For this pocket I used pieces from the die-cut sheet that came in the August kit and a piece of ribbon I cut off from the cascade album tie.
** Panel 2 - For this panel I left it alone. For the pocket I added a bird on a banner! This is from the Birthday Bash Cartridge. To see how I created this using the Paper Layerz paper go here: http://www.clubrubydesigners.com/designer/1540/creations/paper-layerz-the-gypsy-and-my-e2-tutorial-2/3290
**Panel 3 - For this panel I used a star stamp and stamped a row of stars at the top. For the pocket I adhered an owl I cut using the Paper Layerz paper. To see how and get dimensions for the owl please go here: http://www.clubrubydesigners.com/designer/1540/creations/paper-layerz-the-gypsy-and-my-e2-tutorial-1/3289
-->This panel (on Panel THREE still) - I created a pull out "album" to go in the owl embellished pocket. Here are 3 photos that show this pull out album:


To do this:
Cut a piece of cardstock 8 x 10/5 and fold in half
For the front of this cut 3 photo mats 3.5 x 3
I stamped a sentiment on the top and then used the white pen in the August kit to outline it all
The inside of this pull out "album":
On the left side: orange piece is 3.5 x 3 1/8; Brown polka dotted stripe piece is 3.5 x 3/4; and the flower piece is 3.5 x 6
On the right side: the light blue cardstock piece is: 3 3/4 x 8 1/4
Add 3 flowers to the bottom of the right side. Adhering a button to the center of each one. Add a small bird to the bottom of the light blue piece. (from the die-cut sheet in the August kit) Stamp a small sentiment under the cardstock sheet and using the white pen draw on some white dots
For the back of this pull out "album:
Cut a piece of patterned paper 3 3/4 x 10. Ink then add to the "album"
Glue a 4" strip of ribbon to the middle of the patterned paper
I then added a few flowers, a button, and some leaf pieces from the august kit to embellish it up.
Slip this piece into the Mini-Album
Now back to the MAIN album:
4. For the last panel inside the album - I left this piece alone and added a sun from the die-cut sheet in the August kit to the pocket piece and a large orange button from the embellishment bag in the kit to the center of the sun.
THE INSIDE of the MINI-ALBUM is now DONE!
Moving on to the Back Side of the Album!

1. The first panel that we'll work on is going to be our cover! In the first photo here it's the panel all the way on the left!
Add a title to the top of this panel using thickers or other letters that you may have! Use a dymo labeler to help with your title!
Add buttons to the inside of the flowers on the papers and add a few paper flowers. I also added a small bird from the Die-Cut Sheet.

2. For the panel that is next to the cover I added a 3.5 x 3x5 piece of cardstock. On this piece I added a 3 1/4 x 1/2 piece of patterned paper, a dymo labeled word and a tree from the die cut sheet in the kit.

3. For this panel that is next to the "cascade album" panel - I cut 2 pieces of cardstock 3 3/4 x 3 1/2 for the top one and 3 3/4 x 3 3/4 for the bottom one. I added a bird from the diecut sheet in the kit and 2 buttons.

4. Embellishing the "cascade album:
To help keep the cascade album secure I added a binder clip to the side. I tied a ribbon on top of it (secured with hot glue) and then added 3 buttons to the this side and a dymo labeled word to the other side. I then added a journaled piece to the shortest piece of the album and added a dymo labeled word to one of the pieces of the album.
5. Now for the tie that keeps it all closed
The panel that has the "cascade album" on it is where we attach the ribbon. This piece of ribbon is about 28" long. Lift up the Cascade Album and glue it down all the way across. Make sure it's down good! I used hot glue for this task. (you'll also notice that I glued down the longest sheet of the cascade album to the orange and white patterned paper piece. THis helps add stability to it.
Then you can close the album and tie the ribbon across the front cover panel!

Now you can give as a gift or add photos etc.... If you have any questions about this project feel free to e-mail me at wiseguys@mtaonline.net!
Also I make these and sell them for $20 if interested! Just tell me your theme and I'll create one for you!
Happy Scrappin'!
2 comments:
Just a quick note to let you know that a link to this post will be placed on CraftCrave today [13 Aug 01:00am GMT]. Thanks, Maria
what fun! Thanks for sharing.
Post a Comment